

|
|
|
|
|
|
|
|
|
|
|

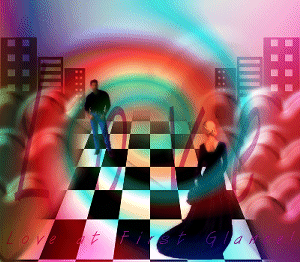
Love At 1st Glance Tutorial 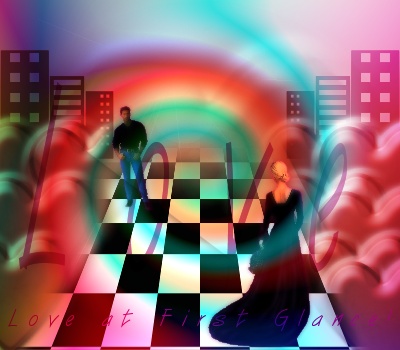 Read the Term of Use to your right before beginning. Terms This tutorial was created to Celebrate Valentine's Day. To the right are the Materials required. Let's Begin: Place all required filters into your plugins storage file. Open the zip. Place the buildings font in your font file. Open a new image 400 x 350 transparent background. Under styles, to the right of your PSP program, find gradient. Find Ultraviolet. Repeats 1, angle 0, invert checked. Flood fill your background. Effects, Illumination effects, sunburst. Color white, density 0, brightness 50, Lightspot: Brightness 54, horizontal 43, vertical 21, circle brightness 30. Apply. Add a new raster layer. Place the heart tube top center sized at 100. Take your deformation tool and enlarge the size of the heart to fill your image by pulling out at both top center and side center nodes. Click any button to apply the deformation. Layer palette, change blend mode to overlay and reduce the opacity to 75. Merge your layers visable. Type tool, find the font buildings. Change the background to #B00275, stoke nill. Size 72, kerning 400, leading 0, vecter checked, type the X holding down the shift key. Resize with the sides and top node to an inch and a half, convert to raster and line the bottom with pink line from the gradient, and move to the left edge. Duplicate this layer and image mirror it. Merge your layers visable. Colors, colorize, hue 255, saturation 109. Add a new layer and flood fill any color. Effects, plugins, Unplugged, shapes, Checkered flag, use the default and apply. Take your deformation tool and slide the top down using the center node until you can see the buildings. Holding the control key take one of the top corners and slide the nodes in until it reaches the inner sides of the buildings. Then move the top down a bit more until it almost resembles a street surface you will need to also move the top nodes in by holding the ctrl key once more. Once your satisfied, click any tool to apply. Take your eraser tool, size 74, opacity 50 and soften the edges of the street. You could also think of this as a game board. The game of love. Add a new layer. Again take your heart tube and fill in the sides of the background between the game board or street, and infront of the buildings. Do not worry about over lapping too much but try not to cover more than half of the back buildings. Begin placing the hearts over the bottom of the buildings working forward. Then take your eraser tool and erase where the hearts overlap the game board or street, leaving again soft edges. Open your tubes of the people, resize by 50%. Add a layer and place the guy as a new selection. Resize him again by 50% and place him to the left back corner of the street. Select none. Add a new layer and edit copy the woman, edit paste her as a new selection and place her to the right front or bottom edge. Turn off all the layers except the people. As you can see they are looking at each other. Merge the two people layers. Effects, plugins, xero, soft mood, haziness 24, glow 125, apply. Merge visable. Get your type tool, select a font and type in a word..I typed Love and left the settings as is, except changed the font to Van Dijk, and used background #B00275. Do what suits you! Then enlarge your lettering to fill at least a half of the image. If created by vector just slide the center nodes out. Then convert it to raster and change the blend mode to multiply and the opacity to 60. I then typed in the words Love at First Glance sized 18, and moved this to the bottom. Merge all layers visable. Add a new raster layer and flood fill any color. Effects, plugins, dsb flux, electrosphere. Change the settings until you get something you like and apply. Effects, Geometric Effects, twirl size 572 and apply. Layers palette, blend mode hard light, move the opacity down to 75 and apply. Lastly I applied a shape to bring your attention closer to the people. Preset shapes rounded corners, background white, foreground null, vector and antialias checked, I drew a rectangle covering both people, then holding my shift key I pushed the left bottom node in. Convert to raster, add a drop shadow of v and h 1, opacity 60, blur 16.5, apply. Layers palette blend mode multiply lower the opacity to 52, take the eraser and soften the upper right corner and the bottom. Merge all flatten and your done and save as a jpeg the bottom image was saved as a gif, see the difference from the top? Enjoy and Happy Valentine's Day!
Created: Tuesday, January 21' 03 |
Materials Required: This tutorial requires a few filters and a few tubes. Filters:
Tubes
All Graphics on this site were created by ES and staff. All rights are reserved.
|